How to Install and Use the Greenfield Version of the UU Web Templates
Return to the UU Web Templates Home.
The Greenfield template uses a programming language called PHP that allows you to update text on the pages without needing to use a web page editor. Instead, you can go to an administrative web page that enables you to change the text right from your browser. The administrative pages require a password before they accept changes. You do not need to know or learn PHP to use the templates -- the programming is already done.
Table of Contents
1. Technical Requirements
2. Transfering the Template to Your Web Server
a. Downloading the templates to your PC or Mac
b. Getting an FTP program
c. Uploading the templates to your web server
3. Customizing the Template for Your Congregation
a. Default username and password
b. Logging into the administrative pages
c. Setting your password
d. Editing the template to display your congregation's name
e. Customizing text, menus, and pictures
4. Troubleshooting
a. Forgotten password
b. Zillions of error messages
5. A Peek into the Technical Details
a. The files that make up each template
b. Creating additional users
6. Technical Support
7. Tips and Tricks
1. Technical Requirements
The Greenfield version of the UU Web Templates requires:
- A web server that runs PHP. Most web hosting services and ISPs support PHP for free.
- Permission for PHP programs to change files on your server. Talk to you web hosting company about whether you need to change the permissions on your web site to allow the PHP programs in the template's administrative pages to make changes to the files on the site. Specifically, PHP programs need to be able to change files in the ??? subdirectory of your site. If you are looking for a web hosting service for your congregation's web site, consider UUism.net (www.uuism.net), run by UU Jim Hermann. UUism.net servers support PHP and Jim can set up your site with the necessary permissions.
- A file transfer program (using a system called FTP) for transfering the template files to your congregation's web server. Windows comes with a dreadful FTP program, so don't try to use it. Instead, use Internet Explorer, your web editor (if you have one that supports FTP), or download a free FTP program (as explained in Getting an FTP program below).
- A web browser program (usually Firefox, Internet Explorer, Mozilla, Netscape, Safari, or Opera) with cookies enabled.
In order to install the files on your congregation's web server, you'll need to know these facts about the server:
- The server name your congregation's web site uses for file transfers. Frequently, it's the same as your congregation's web address, but starting with "ftp" instead of "www" (for example, ftp.unitarian.org).
- Your congregation's username and password on the web server. When typing the password, capitalization matters.
2. Transfering the Template to Your Web Server
Before you can use the UU Web Templates, you need to transfer them to your congregation's web server (that is, the computer on the Internet where your congregation's web site is stored). The easiest way is usually to download the files to your own PC or Mac, and then to upload them from your PC or Mac to your congregation's web server.
All the files that make up the Greenfield template have been zipped together into a ZIP file. There's one ZIP file for each design (Blue-Green, Sunflower, and Faces). You need to download just one file, for the design your congregation has chosen. There's also an EXE file for each design, which is a self-extracting ZIP file (that is, a ZIP file that includes the program for extracting its files).
a. Downloading the templates to your PC or Mac
To download a UU Web Template to your computer, follow these steps:
- Decide which template you are going to use (1, 2, or 3).
- Create a folder on your computer in which to store the web template file. For example, you might want to store it in C:\My Documents\Web Template.
- Click one of the following links to the template you've chosen:
- Your browser should ask what you want to do with the file you clicked. Choose Save and specify where on your computer to store the file (choosing the folder you created in step 2).
- When the file is dowloaded, open it and extract the files that it contains:
ZIP file: If you downloaded a ZIP file,
open it by double-clicking it in Windows Explorer or Finder. The file is a ZIP file (called a Compressed Folder in Windows XP). When you open the ZIP file, you see a list of the files that the ZIP file contains. Then copy the files from the ZIP file to the folder you made in step 2. The easiest way is to drag all the files from the ZIP file's window to the folder's window.
EXE file: If you downloaded an EXE file, move it to the directory where you want to store its files, and then double-click it to extract its files to that directory.
Now you have the template files on your PC or Mac. See The Files That Make Up Each Template for a list of filenames.
Note: If your computer doesn't have a program that can open ZIP files, download the EXE file, not the ZIP file. The EXE files run only under Windows, not on Macs, Linux, or UNIX systems. If you use a Mac, Mac users can get programs named ZipIt, Unzip, or MindExpander from www.macorchard.com. Most Linux/UNIX systems include a utility called gunzip.
b. Getting an FTP program
The next step is to upload the template files to your web server, for which you'll need an FTP program. Wiindows XP (and earlier versions) include an FTP program so lame, requiring you to learn and type a bunch of arcane commands, that we don't recommend it. Instead, use one of the following programs:
- Web page editors: If you use Dreamweaver, it has an FTP program built in. Many other web page editors do, too.
- Windows XP Web Folders: Use Internet Explorer as an FTP program. It's not great, but it works. Type "ftp://yourid@www.yourftpserver.com" into the Address box, replacing "yourid" with your username on the FTP server, and replacing "www.yourftpserver.com" with the name of the FTP server. IE prompts you for your password on the FTP server. When you type it and click OK, you see a listing of the files in your home directory on the web server.
If you want to upload files to a different directory, click that directory's name so that you see that directory. To upload a file, drag it from a Windows Explorer window into the IE window.
- Download and install a freeware or shareware FTP program like WS_FTP. A number a available for download from Download.com and TUCOWS.
For more information about FTP, see the Internet Gurus Guide to FTP at net.gurus.com/ftp.
c. Uploading the templates to your web server
Before you upload the files to your congregation's web server, consider whether there is a web site there already. If your congregation already has a web site, create a subdirectory (folder) called "test" on your web site into which you can put the Greenfield template files. While the files are in this directory, you can configure the template for your congregation and test the pages until they look right -- the pages will all have addresses that include "test/" before the page name. When your new site is ready, you can move the old files into a subdirectory (perhaps called "oldsite") and move the files from your "test" directory to the root directory of the web site.
If you are creating a brand new web site, go ahead and put the Greefield template files right in the root (top-level) directory of your web site.
Once you've determined where on your web server you want to upload the template files, use your web editor, Internet Explorer, or FTP program to upload them. Note that the PHP files (.php) should be uploaded as ASCII (text) and the JPG and GIF graphics files (.jpg and .gif) should be uploaded as binary. Most transfer programs will do this automatically.
3. Customizing the Template for Your Congregation
Finally, you need to change your administrative password, and then provide the text and pictures that transform the blank UU Web Template into your congregation's web site. To perform any of these taks, you log into the administrative pages for your site -- pages that the public never sees.
a. Default username and password
As delivered, the system has one username, with the following password:
- Username: admin
- Password: admin
Be sure to follow the instructions below to change this password! Choose a password that doesn't appear in any English-language dictionary, and that includes both letters and digits.
b. Logging into the administrative pages
Whenever you want to make changes to your site, or changeyour site's password, log in by following these steps:
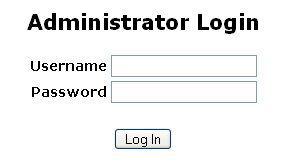
- Display the main administrative page in your browser. Type the domain name of your web site (e.g., www.unitarian.org) followed by "/admin" (don't type the quotes). If you stored the web template files in a subdirectory name on your web server, you'll need to insert a slash and the subdirectory name before "/admin".
- You see the Administrator Login page, shown at right.
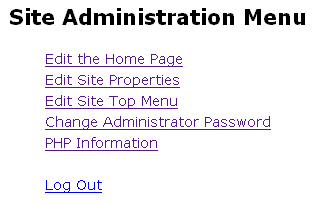
- Type the default username and the password. If you've changed the password, type the password that you set. Click the Log In button.
- You see the Administration Menu, shown at right.
|
|
c. Setting your password
 Before you make any other changes, you should change your password. Whenyou first install the template, the username and password are tehdefaults listed above. You must change the password so that random visitors can't make changes to your site. You leave the username as "admin" unless you want to follow some rather technical steps to create additional usernames and passwords. (If so, see "Creating additional users" later in this document.) Follow these steps:
- Log in, as described in tbe preceding section.
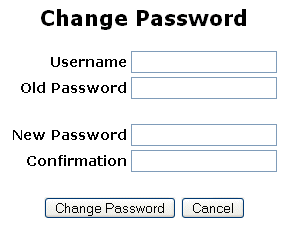
- Click "Change Administrator Password".
- You see the Change Password page, shown at right.
- Type the username and existing password, and then type a new password in both the New Password and Configuration boxes. Don't use a word that's in the dictionary or that is easily guessable, include both letters and digits, but do choose one that you'll be able to remember. And write it down somewhere!
- Click the Change Password button. You see the message "Your password has been changed." Click Continue.
Be sure to change your password! If you don't, anyone who has read this documentation will be able to edit your pages!
d. Editing the template to display your congregation's name
You can change the title that appears in the title bar of the browser and at the top of each page so that it is the name of your UU congregation. It's stored in a file named properties.xml in the /data directory of the site. It also contains the address and other semi-permanent information about your congregation. The file looks like this:
<?xml version="1.0" ?>
<properties>
<banner_line1>First Unitarian Society</banner_line1>
<banner_line2>of Minneapolis</banner_line2>
<footer_line1>Copyright 2005, First Unitarian Society</footer_line1>
<footer_line2>Minneapolis, MN</footer_line2>
<chapter>First Unitarian Society</chapter>
<location>Minneapolis, MN 55403</location>
<country>USA</country>
<universalMenus>0</universalMenus>
</properties>
You can't edit this file via the administrative pages. Instead, you edit the file in a text editor. You can use one of two methods:
- Download the file to your PC, edit the file on your PC using a text editor (not Microsoft Word, or any program that is likely to insert a lot of formatting!), and upload it again. Or,
- Edit the file on your web server using a Linux-based editor like nano, emacs, or vi.
Be sure not to change any of the commands (tags) enclosed in angle brackets (< and >).
e. Customizing text, menus, and pictures
Once you are logged in, as you click from page to page on your site, you see the administrative version of each page, containing links that enable you to change the text and pictures on the page. To beging editing your pages, follow these steps:
- Log in, as described in the section "Logging into the administrative pages."
- Click "Edit the Home Page". You see the administrive version of the home page of your site (click here for a picture).
- If you don't want to edit the home page, click links until you get to the page you want to change.
- Note the blocks of text that you want to replace with real text about your congregation. Each block of text may have a picture above it, which you can also change. Below each block is the link "[Edit Text...]".
- Note the menus that you want to replace with different menu items. Below each is the link "[Edit Menu...]".
Updating text: 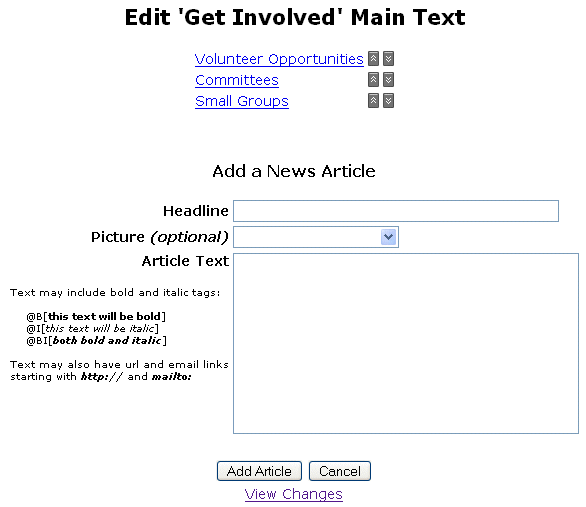 For each text block that you want to change (with the link "[Edit Text...]" below it), follow these steps:
- Write the text that should replace the current text, typing it into a text file on your computer. Use a program like Notepad to create the text file, and save it in case you need the text later. You don't have to exit from your browser to run Notepad -- your computer can run more than one program at a time. Press Alt-Tab to switch from one program to another, or click the program's button on your Taskbar at the bottom of the screen.
- If you want to change the headline (title) at the top of the text, write that, too.
- In your browser, click the "[Edit Text...]" link for the text you want to replace. You see an Edit page where you can specify the headline, filename of a picture to display with the text, and the text itself, as shown at right.
- In the Headline box, type or cut-and-paste the text that you want to use as the headline above the text.
- See the section "Updated pictures" below for how to add pictures.
- In the Body text box, type or cut-and-paste the text that you want to appear on the page.
- Click the Update Text button to make your changes.
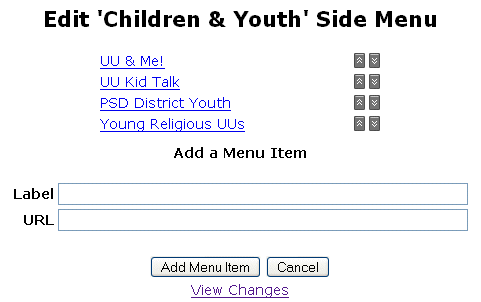 Updating menus: For each menu that you want to change (with the link "[Edit Menu...]" below it), follow these steps:
- In a text file on your computer, write the list of menu items that you want to appear. For each menu item, type label (the text that you want to appear) and the URL (the web address to link to).
- In your browser, click the "[Edit Menu...]" link for the menu that you want to replace. You see an Edit page for where you can list the labels and URLs for the menu, as shown at the right.
- To change an existing menu item, click the item. You see an edit page with boxes for the label and the URL. Type or cut-and-paste the new label and new URL, and then click the Update This Item button.
- To delete an existing menu item, click the item. On the page that appears, click the Delete This Item button.
- To add an item, type or cut-and-paste the label and the URL into the Label and URL boxes at the bottom of the Edit page, and click the Add Menu Items button.
- To move a menu item up or down the list (to change the order of the menu items), click the up-arrow and down-arrow buttons to the right of the menu items.
- To return to a view of the finished page, click the View Changes button.
There is currently a bug in editing menus which prevents the system from remembering changes to the last item on a menu. As a workaround, switch the order of items so that the item you want to edit is not last, edit it, and then move it to be last again.
Updating pictures: For each picture that you want to change, follow these steps:
- Note the pictures that you'll want to replace with pictures from your congregation. You can display teh picture of your choice above each block of text below which you see an "[Edit Text...]" link.
- Create graphics files to replace the placeholder pictures that came with the template. For example, you might want a picture of your minister, your building, or of people in your congregation. Use a graphics editor (like Paint Shop Pro or Windows Paint) to crop and size the digital pictures. Keep pictures small, to keep downloading times fast for your visitors -- dont' make the total number of pictures on a web page more than 100KB.
- Upload the pictures to the web site using your web page editor, Internet Explorer, or FTP program. Put them in the /images directory. (If you installed the web template in a subdirectory of your web site, but the pictures in the images subdirectory of the main tempalte directory.)
- Log in and display the administrative page that controls the page one which you want the picture to appear.
- Click the "[Edit Text...]" link. You see the edit page displayed in the "Updating text" section above.
- To eliminate the picture, set the Image box to the first, blank item.
- To choose a different pictures, sect the Image box to the picture you want. The Image menu shows the filenames of all the graphics stored in the /images directory.
- Click the Update Text button, which updates the picture, too.
4. Troubleshooting
Here are some problems you might run into, with solutions.
a. Forgotten password
If you forget the administrative password for the templates (that is, the password that you enter on the /admin page to login into the administrative pages), UU Web Templates Tech Support can send a replacement password file. See Technical Support for who to contact for help.
b. Zillions of PHP error messages
The PHP programs in the web pages need permission to be able to make changes to the files in the data and admin/data directories, because these directories contain the editable text, menus, and pictures. If you see a set of errors like this, you have a permission problem:
Warning : fopen(/var/www/cvuus/greenfield/data/index_text1.xml): failed to open stream: Permission denied in /var/www/cvuus/greenfield/include/XmlSimpleBaseClass.class.php on line 172
Warning : fwrite(): supplied argument is not a valid stream resource in /var/www/cvuus/greenfield/include/XmlSimpleBaseClass.class.php on line 173
Warning : fclose(): supplied argument is not a valid stream resource in /var/www/cvuus/greenfield/include/XmlSimpleBaseClass.class.php on line 174
Warning : Cannot modify header information - headers already sent by (output started at /var/www/cvuus/greenfield/include/XmlSimpleBaseClass.class.php:172) in /var/www/cvuus/greenfield/admin/textblock.php on line 27
These error messages indicate that the PHP program in the web page tried to modify one of the data files, but it "failed to open" because "Permission denied."
You need to talk to technical support at your web hosting company, or whoever manages the computer on which your congregation's web site it stored. Tell them that the PHP programming in the web pages -- actually, the web pserver program (Apache) itself -- needs permission to be able to make changes to the files in the /data and /admin/data directories. Request that these directories be owned by the same user that Apache runs as.
5. A Peek into the Technical Details
The Greenfields version of the template uses code written in the PHP programming language that is included on each of the web pages. Because the pages include PHP code, the filenames of the pages end in ".php". The PHP code includes (copies in) text from separate text files into the web pages before they are sent to the user's browser. This means that when you update the text file, the web page(s) that include that text file are automatically updated. For example, if your congregation changes its phone number, you make the correction in one file, and this information is automatically included on all the pages on your web site that include that file.
The UU web tempaltes also use style sheets (CSS) to define how the text on the pages is formatted. The typefaces, type sizes, and other aspects of text formatting are stored in a .css file that is referred to by all the web pages. Changing the formatting in the .css file changes the format of text in all the web pages in the template.
When you use an administrative page to update a file that is part of the site, the administrative page displays the contents of the file, enables you to make changes, and (when you click Save), stores the updated text in the file. Be careful that only one person makes changes to a file at a time. If one person is editing a file, another person also starts editing the file, the first person clicks Save, and then the second person clicks Save, only the second person's changes will be saved, because the fierst person's version will be overwritten by the second person.
a. The files that make up each template
Once you have transfered the files to your congregation's web server, you should have the following files.
Web pages: These are the pages that the public will see.
- index.php: home page
- aboutus.php: "About Us" page
- newcomers.php: "Newcomers" page
- news.php: News & Events page
- getinvolved.php: Get Involved page
- youth.php: Religious Education page
- contactus.php: Contact Us
Graphics files: These are pictures and logos that appear on one or more pages.
- /images is a directory that contains the pictures that you upload to your site for inclusing on your pages, e.g., pictures of your minister, building, families, meetings, and worship.
- Backgrounds and pictures are contained in a directory called __graphics1 (for the Faces design), __graphics3 (for the Blue-green design), or __graphics4 (for the Sunflower design).
- /admin/buttons contains the graphics for buttons
Data files: These are the files that contain the temporary text and pictures that you will replace with text about and pictures of your own congregation.
- /data: All user-supplied information, except the password and image files
- /admin/data: Password file
Other files:
- fus.css: CSS (cascadng style sheet) containing typefaces, typesizes, spacing, and other formatting used throughout the pages
- PHP code files in the __include directory
- /include
b. Creating additional users
Normally, the system has one username, "admin", and you change only the password. However, you can change the username or create usernames if you don't mind editing an XML file. The file is called login.xml, it's stored in the /admin/data directory, and you can edit it with any Linux/UNIX editor (like nano, pico, emacs, or vi).
The default login.xml looks like this:
<?xml version="1.0" ?>
<properties>
<admin>D033E22AE348AEB5660FC2140AEC35850C4DA997</admin>
</properties>
An administrator could manually duplicate the admin line and edit the <admin></admin> tag to create a new user, like this:
<?xml version="1.0" ?>
<properties>
<admin>D033E22AE348AEB5660FC2140AEC35850C4DA997</admin>
<margy>D033E22AE348AEB5660FC2140AEC35850C4DA997</margy>
</properties>
Then you could log in as "margy" with the same password as "admin", but once logged in you can change the password to whatever you want.
A security note: The login.xml file is in a web folder because it simplifies installation. However this makes it viewable by anyone thru the browser. We encrypt (hash) the password to make it very hard to forge (not impossible though, for commonplace passwords.) If an attacker is able to overwrite the file (through FTP, for example) with another version, the attacker can install other usernames and passwords and edit your pages.
6. Technical Support
You can get help with installation and design by e-mailing one of the team that created these templates:
- Diana Allen, at diana@uuism.org
- Mark Gibbons, at markgg@sbcglobal.net
- Jim Hermann, at jim@uuism.org
If your congregation uses the UU Web Templates, please consider making a donation to help defray the cost of the project. (Information about donations will be available later. Or ask Mark or Diana about it.)
Thanks for using the UU Web Templates, and we hope that they are helpful to your UU congregation!
7. Tips and Tricks
As congregations use the UU Web Templates, we'll add notes here about additional things you can do to customize your site. If you do something interesting or useful with the templates, please write to Diana Allen at diana@uuism.org with information, and we'll add it here.
a. Adding text sections to a page
Each of the pages that come with the template (the pages that can be updated via web forms, listed in "The files that make up each template" above) is constructed by PHP scripts from the XML files in your site's /data directory. For example, the "News & Events" page is made up of the news.php page, plus the /data/news*.xml files. For each page, the /data directory contains these XML files (replace "news" with the name of whichever page you are working on):
- news.xml - not used (Are these left behind by the develpers? Can we delete them?)
- news_menu.xml - list of items in the lefthand section of the page
- news_right.xml - text in the righthand section of the page
- news_text1.xml, news_text2.xml, etc. - each file contains one church of text, and optional filename of a picture, that appears in the main (center) section of the page
If you want fewer or more sections in the center of the page, copy *_text1.xml file and name it with the next integer (e.g., if you already have files 1 and 2, name it as 3). Make sure that the file has the same permissions and group owner as the other files. Poof! A new section should appear on the page.
b. Adding static pages to your site
What if you want to add pages to your site beyond what's in the template? You can create a page that uses the same page design, and then you can add whatever text you want.
1. Create a page with a filename ending in .php.
2. Add the following to the beginning of the page:
<?php
include_once("templateconfig.php");
include_once($TEMPLATE_PAGE_START);
?>
<!-- PAGE CONTENT GOES HERE -->
This code tells PHP to include the formatting that the web templates use.
3. Add whatever you want to appear on the page.
4. Add this at the end of the page:
<!-- END OF PAGE CONTENT -->
<?php
include_once($TEMPLATE_PAGE_END);
?>
This code tells PHP to include the rest of the formatting that the web templates use.
5. Save the page in the root directory of your web site. If you want to save it in a subdirectory, you may need to fool with the filenames in the include() functions to point to the relative location of the files.
Return to the UU Web Templates Home.